Contents:
- Understanding the French Hair Pin: Design and Function
- Preparing Your Hair for French Hair Pins
- The Basic Technique: Positioning and Insertion
- Advanced Pinning Strategies for Different Styles
- Common Mistakes to Avoid
- Caring for and Maintaining Your French Hair Pins
- Troubleshooting Common Problems
- Choosing the Right Pin for Your Hair Type
- French Hair Pins Across Different Occasions
- Frequently Asked Questions
- Mastering French Hair Pins: Your Next Steps
You’re standing in front of the mirror with a handful of hairpins scattered across the vanity, watching as your carefully styled updo threatens to collapse within minutes. This happens to countless people every week—the frustration of hair slipping free, the pins refusing to grip properly, the uncomfortable pressure across the scalp. The solution often lies not in buying expensive styling products, but in understanding the simple mechanics of using a French hair pin correctly.
French hair pins, also called kirby grips or crinkle pins, have remained a staple of hair care for over a century. Unlike their straight counterparts, these crimped pins feature a specific wavy or textured surface that creates friction, allowing them to grip hair far more effectively. Yet many people use them without understanding their design or the techniques that unlock their potential. Once you grasp the fundamentals, you’ll find these modest tools become indispensable for everything from securing everyday styles to creating elaborate formal updos.
Understanding the French Hair Pin: Design and Function
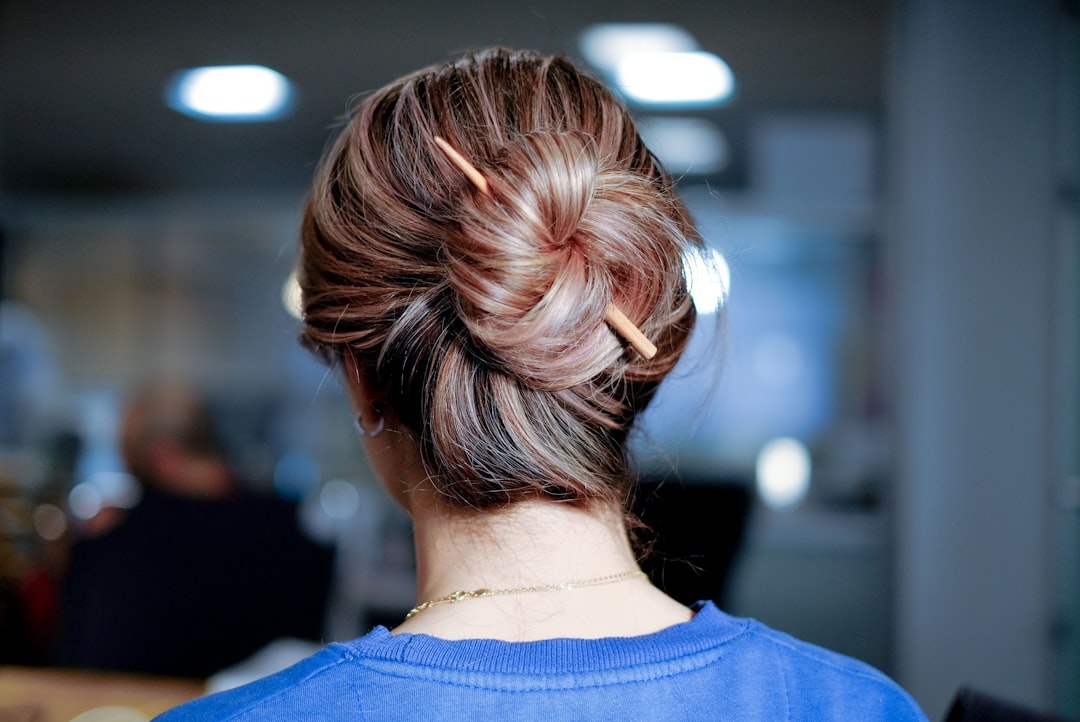
A French hair pin consists of two primary components: a textured, crimped barrel and a smooth, flat underside. This asymmetrical design is deliberate. The crimped section creates hundreds of tiny grip points that catch individual hair strands, while the smooth underside sits against your scalp without pulling uncomfortably. The standard length ranges from 50mm to 75mm, with most people finding the 65mm size versatile enough for daily use.
The material construction matters more than many realise. Stainless steel pins cost slightly more—typically between £2 and £5 for a pack of a dozen—but resist rust and last years longer than basic coated pins. For budget-conscious buyers, this small upfront investment means replacing pins far less frequently, ultimately saving money. The coating on cheaper pins often flakes after several months of regular use, exposing the metal beneath and reducing grip effectiveness.
The wave or crimp pattern itself serves a critical function. When you examine a French pin closely, you’ll notice the crimps create a channel rather than a smooth surface. This channel physically interlocks with sections of hair, preventing rotation and slippage. Pins marketed as “extra grip” simply feature more pronounced crimping, though standard crimps work perfectly well for most applications.
Preparing Your Hair for French Hair Pins
Hair preparation determines how effectively any pin will hold. Freshly washed hair, while clean, presents a challenge because it lacks texture and grip. Most professionals recommend using hair that is one to three days old, when natural oils have accumulated along the hair shaft, creating a slightly rougher surface that pins grip more readily. If you must work with freshly washed hair, a light texturising spray (a £4 to £7 product) significantly improves hold without leaving residue.
Drying technique influences pin performance as well. Completely dry hair slides more easily than hair with slight dampness. For this reason, many stylists dry hair until about 80 percent dry, then allow it to air-dry slightly or work with it while still faintly damp. This moisture content—barely perceptible to touch—creates just enough friction for superior pin grip.
For those seeking sustainability in their hair care routine, consider extending the life of your French pins through mindful use rather than constantly repurchasing sets. Stainless steel pins last indefinitely with proper care, making them far more eco-friendly than disposable styling products. A single high-quality pin can serve you faithfully for five to ten years if treated carefully.
The Basic Technique: Positioning and Insertion
The most common mistake people make involves inserting pins at incorrect angles. The optimal technique requires pinning at a 45-degree angle from vertical, not horizontally flat against the scalp. This angle maximises contact between the crimped surface and the hair section, creating secure hold with minimal pins. Begin by dividing your hair into sections roughly 5 to 7 centimetres wide—about the diameter of your pin.
Hold the section of hair slightly away from your head and roll it into a small loop or twist. The twist needn’t be tight; a loose one-turn twist is sufficient. Now introduce the pin with the crimped surface facing the rolled section, inserting it at that 45-degree angle with the smooth underside against your scalp. Push the pin fully through the twisted hair section until only the end protrudes from your style.
The insertion direction matters. Always insert the pin with the smooth, open end first, the crimped end following through. This order ensures the textured surface engages with your hair rather than sliding past it. Feel for resistance as the pin moves through your hair; this resistance confirms the crimped surface is catching individual strands. Without this tactile feedback, your pin likely isn’t gripping properly.
Advanced Pinning Strategies for Different Styles
Securing a simple low bun requires two to four pins, depending on hair density. After twisting your hair into the desired coil shape, insert pins diagonally through the bun from different angles. Spacing pins around the bun’s circumference, rather than clustering them in one spot, distributes the weight evenly and creates a far more stable result. Each pin should feel like it’s meeting resistance.
Half-up hairstyles demand a slightly different approach. Clip your upper section in place temporarily, then use pins inserted horizontally (rather than at an angle) directly beneath the clip. The pins act as insurance, preventing the clip from slipping downward. Typically, two pins suffice, positioned on either side of the clip with the smooth underside facing down toward your neck.
Voluminous updos benefit from a pinning grid technique. Imagine your entire updo divided into a grid of small sections, each approximately 10 centimetres across. Within each section, insert one pin at a 45-degree angle. This creates a network of support rather than relying on single points of grip. While it sounds labour-intensive, a full formal updo actually uses only eight to twelve pins despite its elaborate appearance.
Common Mistakes to Avoid
Overloading with pins ranks among the top errors. More pins do not equal better security; in fact, using too many pins often creates uncomfortable pressure and actually reduces hold by distorting the hair’s structure. Aim for the minimum number required to maintain your style throughout the day—typically far fewer than most people think.
Inserting pins at ninety-degree angles (completely flat) prevents the crimped surface from engaging properly with hair. This angle force your hair to rely on friction alone, which fails as soon as you move. The 45-degree angle works because it creates a mechanical lock rather than mere friction.
Neglecting to twist or section your hair before pinning nearly guarantees slippage. A pin inserted into loose, unsecured hair will gradually work its way out as the hair shifts and settles throughout the day. Always secure your hair into a defined shape—a twist, coil, or braided section—before attempting to pin it.
Using pins with damaged or corroded coating reduces grip significantly. If your pins are flaking or discoloured, replace them. The small cost of a new dozen pins (typically £3 to £5 for quality stainless steel versions) far outweighs the frustration of constantly adjusting failing pins during your day.
Caring for and Maintaining Your French Hair Pins
Cleaning your pins extends their lifespan considerably. Remove accumulated hair and product residue weekly by wiping pins with a damp cloth and mild soap. For deeper cleaning, soak pins in warm water with a drop of washing liquid for five minutes, then rinse thoroughly and dry immediately. This simple routine prevents buildup that can compromise grip.
Storage matters as well. Keep pins in a clean, dry container—a small tin or ziplock bag works perfectly. Storing them loosely in a humid bathroom drawer accelerates rust formation, even on coated pins. A dry bedroom drawer or bedroom vanity keeps them in optimal condition for years.
Inspect your pins regularly for damage. Small cracks in the coating or bent crimps significantly reduce functionality. Rather than struggling with compromised pins, retire them and invest in fresh ones. Given that a dozen quality stainless steel pins cost under £5, maintaining a fresh supply is genuinely affordable even for budget-conscious shoppers.
Troubleshooting Common Problems
If pins consistently slip out within an hour, your hair preparation likely needs adjustment. Try using older hair (two to three days unwashed) with a light texturising spray. The combination of natural oil and spray texture dramatically improves grip. Alternatively, you may not be twisting your hair sufficiently before pinning; a tighter twist creates more defined structure for the pin to grip.
Uncomfortable scalp pressure suggests you’re using too many pins or inserting them too forcefully. Reduce the number of pins and insert them with steady, gentle pressure rather than jabbing motions. Properly positioned pins should feel completely unnoticed within minutes of insertion.
Visible bumps or bulges beneath your styled hair indicate either incorrect pin placement or insufficient smoothing of the underlying hair structure. Before pinning, ensure your hair lies flat and smooth in your desired shape. Use your fingers or a fine-toothed comb to smooth any flyaways or bumps that might later show through.
Choosing the Right Pin for Your Hair Type
Hair texture and density influence which pins work best. Fine, silky hair benefits from slightly shorter pins (50mm) that require less material to secure successfully. Thicker, more textured hair typically grips better and can handle standard 65mm pins comfortably. Curly hair, with its natural texture, often requires fewer pins than straight hair because the curl structure itself provides grip points.
Colour-matched pins prove worthwhile if you’re particular about appearance, though they add nothing to functionality. A brunette with dark pins will find them nearly invisible in an updo, while the opposite holds true for lighter hair. Packs containing mixed metallic tones (gold, silver, rose gold) offer flexibility if you work with multiple hair colours or use pins for different occasions.
The thickness of the pin’s barrel slightly affects how many you can layer without creating uncomfortable bulk. Standard pins measure approximately 4mm in diameter, while thinner versions measure 3.5mm. For fine hair or situations where you want minimal visibility, thinner pins allow you to use the same number of holds with less bulk.
French Hair Pins Across Different Occasions
Everyday casual styles rarely need more than two or three pins. A simple low knot held with two pins can carry you through a full workday, resisting movement through exercise, weather changes, and normal activity. The key is proper technique rather than quantity.
Formal events demand more elaborate approaches. A wedding guest with an updo typically benefits from four to six pins positioned to distribute weight evenly, plus the addition of decorative elements like jewelled clip-ins or fresh flowers. The pins remain invisible beneath the styling while providing the essential structure that keeps your appearance polished throughout hours of dancing and mingling.
Athletic activities require exceptional security. Runners, gym-goers, and swimmers should use six to eight pins distributed throughout their bun or ponytail base, plus a quality elastic band for the initial securing. This combination can withstand impact, vertical movement, and even water exposure without shifting noticeably.
Frequently Asked Questions
How many French hair pins do I actually need?
Most daily styles require just two to four pins. Start with the minimum and add only if you notice slipping during the day. A pack of a dozen pins should last months with proper care.
Can I use French hair pins on very short hair?
Yes, if your hair is at least 10-12 centimetres long. Shorter styles don’t provide enough hair length for the pin to grip effectively. For pixie cuts or very short bobs, alternative securing methods work better.
Do pin colours actually affect hold, or is it purely cosmetic?
Colour is purely cosmetic. All properly manufactured pins, regardless of colour, feature identical crimping and grip functionality. Choose colours that match your hair for invisibility in styled hair.
How long should French hair pins last?
Quality stainless steel pins last five to ten years with proper care and storage. Basic coated pins typically fail after six to eighteen months as the coating flakes. The upfront cost difference is negligible compared to replacement frequency.
Can I sleep in French hair pins?
Not recommended for comfort or pin longevity. Sleeping with pins puts excessive pressure on your scalp, can cause headaches, and bends the pins out of shape. Remove pins before bed and restyle in the morning if needed.
What’s the difference between French pins and bobby pins?
French pins have crimped surfaces that grip hair mechanically. Bobby pins are smooth and rely on tension. French pins generally hold better with proper technique, especially for structured styles like buns and updos.
Mastering French Hair Pins: Your Next Steps
Understanding French hair pin mechanics transforms them from frustrating tools into reliable allies. The 45-degree insertion angle, proper hair preparation, and appropriate sectioning form the foundation of successful use. Start with your everyday style and experiment with just two pins, noticing how the angle and twist affect hold quality. You’ll quickly develop an intuition for what works with your specific hair type and texture.
Next time you’re frustrated with a collapsing style, remember that the solution likely isn’t buying more pins or trying expensive products. It’s executing the proper technique with the tools you already have. Invest in quality stainless steel pins if you haven’t already, clean them regularly, and store them properly. With these fundamentals in place, you’ll find yourself reaching for French hair pins confidently, whether you’re creating a simple weekday style or an elaborate formal updo. The elegance of this tool lies in its simplicity combined with precise technique—a combination that never fails when properly executed.
+ There are no comments
Add yours